Thursday, June 30, 2016

Custom Session Expire Time for individual session variable. | How do I expire a PHP session after given time?

session handling


Laravel has a very well documentation for Session. Those who're not aware of it, just go through first. In this session I'm gonna discuss about how to set timer for individual session variable. Laravel has a default session lifetime in config/session.php.  That's for general purpose means it's for overall session lifetime for the whole application. But what if you need to put a custom timer in specific sessions? Means after certain time it'll unset or kill that session. So today I'm gonna writing about it.

In Laravel, we can save or store a session by following way:

 Session::set('name', $name);
Now let's put another session variable with  the required one. Such as,
 Session::set('LAST_ACTIVITY',time());

Now suppose we want to show this 'name' session in our view page, We can show show the Session by the following Way:
{{Session::get('name')}}
Now Let's say we gonna store the session for one minute. Means it'll show the session variable for 1 minute for in our view page. How we can do it? It's quite easy. What we need to do is just compare the LAST_ACTIVITY  session variable with time() method, so when it's greater than 60 means 1 minute it'll remove the session by Session::forget() method. So what we stored in session after 1 minute if we load the page we won't see that session in our view page.

@if (Session::get('LAST_ACTIVITY') && (time() - Session::get('LAST_ACTIVITY') > 60 ))
      {{Session::forget('name')}}
  @else
     {{Session::get('name')}}
  @endif
So, That's it for today. It was a very interesting and important session indeed. Hope you gonna like it. So stay connected with my blog till the next Tutorial.

Thank you!


Wednesday, June 29, 2016

How to Pass Flash Notification in session in Laravel? | Session Flash Message in Laravel.


Many of you heard about flash messages but couldn't get any idea how you can show in front end side of your application. Here is the tutorial I have made by which you can easily send flash notification in your application. Let's start the session then.

1. First you need to add a package  to your Laravel Application.You can install the package for the below link:


(the whole installation process is there in the link, if you follow that clearly you can easily install it besides if you find any difficulty don't forget to mention in the comment section)

2. Now Let's  Make  routes first in our application. Suppose we want to save user information. So we need a user  getUser page where we gonna save user details.

routes.php

Route::group(['middleware' => ['web']], function () {
    Route::get('/getUser',[
'uses'=>'UserController@getUser',
'as'=>'getUser'
]);
Route::post('/saveUser',[
'uses'=>'UserController@saveUser',
'as'=>'saveUser'
]);
});

2. Now Let's Make UserController on which we gonna write the logic of HTTP request.

UserController.php

<?php
namespace App\Http\Controllers;
use Illuminate\Http\Request;
use App\Http\Requests;
use App\User;
use Response;
use Flash;
class UserController extends Controller
{
    public function getUser()
      {
                 return view('getUser');
  }
    public function saveUser(Request $request)
     {
         $this->validate($request,[
            'name' => 'required',          
            'email' => 'required|unique:users',          
            ]);
     $user=new User();
     $user->name= $request->Input(['name']);
     $user->email=$request->Input(['email']);
     $user->save();
      flash()->success('User Saved Successfully.'); 
     return redirect('getUser');
     }
}

3. Now thefinal Let's make the view page where we will store the data and  show the Error.

getUser.blade.php


<html>
<head>
<title> Create User</title>
<link rel="stylesheet" href="https://maxcdn.bootstrapcdn.com/bootstrap/3.3.6/css/bootstrap.min.css"
integrity="sha384-1q8mTJOASx8j1Au+a5WDVnPi2lkFfwwEAa8hDDdjZlpLegxhjVME1fgjWPGmkzs7" 
 crossorigin="anonymous">
</head>
<body>
@if(count($errors) > 0)
    <div class="row">
       <div class="col-md-4 col-md-offset-4 error">
            <ul>
                @foreach($errors->all() as $error)
                    <li>{{$error}}</li>
                @endforeach
            </ul>
        </div>
    </div>
@endif
/* Don't forget to add this Code inside of your view page, because this is where we gonna show the flash message */
@if(Session::has('flash_message')) <div class="alert alert-success"><em> {!! session('flash_message') !!}</em></div> @endif @if (Session::has('flash_notification.message')) <div class="alert alert-{{ Session::get('flash_notification.level') }}"> <button type="button" class="close" data-dismiss="alert" aria-hidden="true">&times;</button> {{ Session::get('flash_notification.message') }} </div> @endif

<div class="container" >
<h3> Create Department </h3>
{!! Form::open(array('route' => 'saveUser','class'=>'form-horizontal','method'=>'POST'))  !!}
    {!! Form::token(); !!}
    {!!   csrf_field() ; !!} 
        
   <div class="form-group">
     <label>Name</label>
     <input type="text" name="name" class="form-control"  placeholder="Name">
   </div>
     
      <div class="form-group">
     <label>Email</label>
     <input type="email" name="email" class="form-control"  placeholder="Email">
   </div>
      <button type="submit" class="btn btn-default">Submit</button>
{!! Form::close() !!}
</div>     
</body>
</html>

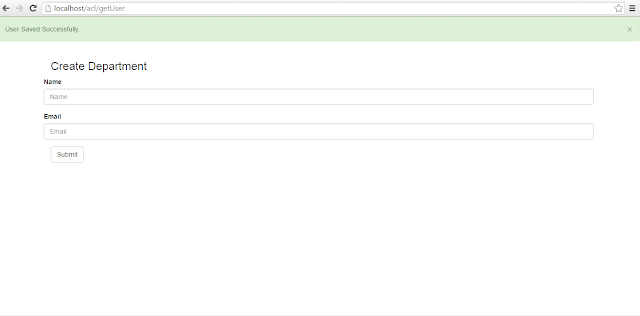
4. Now if we go to the required route and do the HTTP request (here we gonna store user data in database), If you successfully completed the request you will see the flash message like below:


flash notification demo


You can send list of flash messages if you want, just go through link which  i have provided from the very first of this session.


That's it for today. If you find any difficulty don't forget to ping me in comment. And yes stay connected with my blog.

Thank you.
Tuesday, June 28, 2016

How to count Page Views using Redis? | Max View Counter using Redis


page view count with redis


In this short tutorial I'm gonna talking about how you can count No of page views or Article Views in your Blog using Redis. You can ask why using Redis? Because Redis will keep the data in session so that no need of storing the data in Database or View Counts.

So Let's start the session:

1. Let''s define the Route first:

Routes.php
Route::get('/article/{id}', [
   'uses'=>'UserController@pageView',
   'as'=>'page'
]);
2. Let's define the UserController@PageView

UserController.php


public function pageView(Request $request,$id)
        {
            $redis = \Redis::connection();
            $views=$redis->incr('article'.$id.'view');
            return 'This is article with id: '.$id.' And It has '.$views. ' Views';
        }

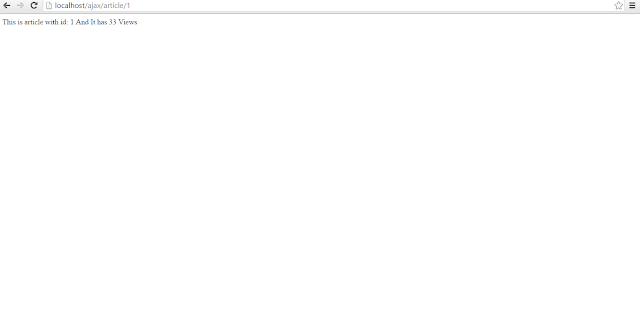
That's it. Now if you access the route, you'll see the No of page views Like following:


page view counter demo


Ok, So that's it for today, Hope you enjoyed the Post. Stay connected with my Blog.
Thank you!


How to generate Random Password in Laravel? | How to make Hashed Password in Laravel?


random password generator


In this tutorial we gonna talk about how can you generate a random password for the user. But we need to know why it's needed first.

Suppose there is a situation of sending password to the user for credential. So it's better to send him a hash::make password so other couldn't break it the middle. Besides if you save hashed password in database other's will not able to crack it. So, Let's begin how you can generate the secure hashed password in Laravel.

Laravel has a helper function called str_random() by which you can generate random string. And by this random string you can generate Hashed password.
$hashed_random_password = Hash::make(str_random(8));
and yes don't forget to use namespace otherwise it'll show namespace error:

use Illuminate\Support\Facades\Hash;
Generated password will be look like this:
And hashed password will be something like this:

That's it for today, hope the article will be helpful for you. Don't hesitate to ping me on comment if you find any difficulty.


Monday, June 27, 2016

How to show Validation Error in Laravel? | Request Validation Error in Laravel.


laravel validation


In this session how you can show validation error from Server Side to Client Side in Laravel Application. It's quite easy just follow the following steps.

1. Let's  Make  routes first. Suppose we want to save user information. So we need a user  getUser page where we gonna save user details.

routes.php

Route::group(['middleware' => ['web']], function () {
    Route::get('/getUser',[
'uses'=>'UserController@getUser',
'as'=>'getUser'
]);
Route::post('/saveUser',[
'uses'=>'UserController@saveUser',
'as'=>'saveUser'
]);
});

2. Now Let's Make UserController on which we gonna write the logic of HTTP request.

UserController.php

<?php
namespace App\Http\Controllers;
use Illuminate\Http\Request;
use App\Http\Requests;
use App\User;
use Response;
class UserController extends Controller
{
    public function getUser()
    {
     return view('getUser');
    }
    public function saveUser(Request $request)
     {
         $this->validate($request,[
            'name' => 'required',          
            'email' => 'required|unique:users',          
            ]);
     $user=new User();
     $user->name= $request->Input(['name']);
     $user->email=$request->Input(['email']);
     $user->save();
     return redirect('getUser');
     }
}

3. Now thefinal Let's make the view page where we will store the data and  show the Error.

getUser.blade.php


<html>
<head>
<title> Create User</title>
<link rel="stylesheet" href="https://maxcdn.bootstrapcdn.com/bootstrap/3.3.6/css/bootstrap.min.css"
 integrity="sha384-1q8mTJOASx8j1Au+a5WDVnPi2lkFfwwEAa8hDDdjZlpLegxhjVME1fgjWPGmkzs7" 
 crossorigin="anonymous">
</head>
<body>
/* Don't forget to add this Code inside of your view page, because this is where we gonna show the error message */

@if(count($errors) > 0)
    <div class="row">
        <div class="col-md-4 col-md-offset-4 error">
            <ul>
                @foreach($errors->all() as $error)
                    <li>{{$error}}</li>
                @endforeach
            </ul>
        </div>
    </div>
@endif
<div class="container" >
<h3> Create Department </h3>
{!! Form::open(array('route' => 'saveUser','class'=>'form-horizontal','method'=>'POST'))  !!}
    {!! Form::token(); !!}
    {!!   csrf_field() ; !!} 
        
   <div class="form-group">
     <label>Name</label>
     <input type="text" name="name" class="form-control"  placeholder="Name">
   </div>
      
      <div class="form-group">
     <label>Email</label>
     <input type="email" name="email" class="form-control"  placeholder="Email">
   </div>
  
   <button type="submit" class="btn btn-default">Submit</button>
{!! Form::close() !!}
</div>
     
</body>
</html>

4. Now if we go to the required route and do the HTTP request (here we gonna store user data in database), let's not put any data in form and try to save in database and you'll see the Error Message appearing on the page like following :


error validation demo


5.  So, as you see it's very easy to show validation Error in your web page. You can show flash messages also in your web page. I'm gonna make a tutorial on flash Error Message very soon. So till then stay connected with my blog.

Thank you.



Cascading / Dependent / Dynamic Dropdown list in Laravel using Ajax

laravel cascading dropdown


There is a situation where you want to populate your input select based on another input . For instance, in Category - Subcategory relationship where Category has many Subcategory. So in each Subcategory has its own Category . In your select input you don’t want to display all Categories to a Subcategory that has no relation to it.
What we want is to repopulate the Category input select based on the Subcategory selection. So that when you select a Subcategory only those Categories under that Subcategory will be displayed.
Now let’s  start how can we do it with Ajax and Laravel. Just do follow the following steps:

1. Let's make  a view where we want to show that cascaded dropdown :
       <div class="form-group">
            <label for="">Category</label>
            <select class="form-control input-sm" required name="category_id" id="category" >
            <option>Select a Category</option>
            @foreach($category as $row)
            <option value="{{$row->id}}">{{$row->name}}</option>
            @endforeach
            </select>
        </div> 

         <div class="form-group">
            <label for="">Subcategory</label>
            <select class="form-control input-sm" required name="subcategory_id" id="category" >
            <option value=""></option>
            </select>
        </div> 

2 . Let's make Category and Sub Category table using artisan command :
php artisan make:migration create_categories_table

php artisan make:migration create_subcategories_table
It'll create two migration file in your database/migrations folder in your laravel application.
3. Now let's put foreign key in  subcategories table with category_id and run the following command:
php artisan migrate
It will make categories and subcategories table in your database.
4. Now let's put some demo data in your database. Let's say categories table  put Electronics &  Books and in subcategories table put  fridge, tv, mobile with categorie_id '1' and put TextBooks, Magazines with category_id '2'.
Fill the database with above procedure.
5. Let's make Route  which will load the cascaded/dependent value  : 
Route::get('ajax-category-subcategory',function(Request $request){
$cat_id = $request::input(['cat_id']);  
$subcategories=\App\Subcategory::where('category_id','=',$cat_id)->get();
return Response::json($subcategories);
});

6. Now we gonna write the ajax part in view page. Write the ajax part before closing body tag.
<script>
      $('#category').on('change',function(e){       
         $('#subcategory').find('option').remove().end();
           var cat_id = $('#category option:selected').attr('value');           
             var info=$.get("{{url('ajax-category-subcategory')}}",{cat_id:cat_id});
               info.done(function(data){     
                  $.each(data,function(index,subcatObj){
                     $('#subcategory').append('<option value="'+subcatObj.id+'">'+
                                subcatObj.name+'</option>');
                    });
        });            
        info.fail(function(){
          alert('ok');
        });
       });
    </script>

7. Now if you go the above mentioned route you'll load the view page and select any of the category.You'll see the subcategory list will loaded related the Category.
That's it for today. Hope you like the tutorial. Stay connected with my blog. See you in next session! 
Thank you.

Sunday, June 26, 2016

How to Make Multiple database connections in the same Laravel project?


multiple DB connection


Sometimes there could be a situation where we have our main project database, but we have to depend on/ need  some external data from another database. So we need to configure the other database with the existing database. In real life example such as Blog. It could  be maintained by 3rd party software. So in that situation we need to use the external data source to sync with the existing one. Let's stop the chitchat and start the session.


1. First we need to change the configure file in config/database.php file. Here we gonna add a new database engine configure. In this tutorial I'm gonna add mySQL server. So add this configuration in connections  array.


'mysql_external' => [
            'driver'    => 'mysql',
            'host'      => env('DB_EXT_HOST', 'localhost'),
            'database'  => env('DB_EXT_DATABASE', 'forge'),
            'username'  => env('DB_EXT_USERNAME', 'forge'),
            'password'  => env('DB_EXT_PASSWORD', ''),
            'charset'   => 'utf8',
            'collation' => 'utf8_unicode_ci',
            'prefix'    => '',
            'strict'    => false,
            'engine'    => null,
        ],


2. Then in .env file add this lines with the existing lines.

DB_EXT_HOST=localhost
DB_EXT_DATABASE=acl             // suppose our new database name is 'acl'
DB_EXT_USERNAME=root
DB_EXT_PASSWORD=


3. Now Let’s go to the controller section. Here is the main part because here you’ll see how you can connect the new database with the existing one.

 public function getTest()
    {
        $user = DB::connection('mysql_external')->table('users')->get();
        print_r($user);
    }


In this controller we connect the other database with DB::connection() method which will connect with the other database and retreive data from that source.

So That’s it for today. Hope you like the session. See you in the next session.

Thank you.