How to import csv/ excel file into database in laravel? | Upload CSV / Excel file and import it to database using Laravel
In this tutorial I have shown you how you can Import CSV/ excel file into Database Sometimes we need to import csv / excel file into database for update purpose or new data has came which we need to save in database . Here we used Maatwebsite/Laravel-Excel package for generating the csv or excel format.
So lets see how we can do it..
1. First we need to install the Maatwebsite/Laravel-Excel package in our laravel project. Installing process has fully described in documentation itself. Bu if you find any difficulty you can comment it here.
3. Let's create a Model and database with name 'Item' with the following command in cmd inside of your project :
php artisan make:model Item -m
4. Use following code in Model name Item.php :<?php
namespace App;
use Illuminate\Database\Eloquent\Model;
class Item extends Model
{
public $fillable = ['title','description'];
}<?php
use Illuminate\Database\Schema\Blueprint;
use Illuminate\Database\Migrations\Migration;
class CreateItemsTable extends Migration
{
/**
* Run the migrations.
*
* @return void
*/
public function up()
{
Schema::create('items', function (Blueprint $table) {
$table->increments('id');
$table->string('title');
$table->text('description');
$table->timestamps();
});
}
/**
* Reverse the migrations.
*
* @return void
*/
public function down()
{
Schema::drop('items');
}
}php artisan migrate
7. Now go to route and write the following code in routes.php
<?php

Route::get('importExport', 'ImportController@importExport');
Route::post('importExcel', 'ImportController@importExcel');
8. Now let's create Importcontroller.php using following code:
php artisan make:controller ImportController
9. Now change the following code with the existing code of Importcontroller.php
<?php

namespace App\Http\Controllers;

use Illuminate\Http\Request;
use App\Http\Requests;
use DB;
use Excel;
use App\Item;
use Illuminate\Support\Facades\Input;
use Validator;
use Illuminate\Support\Facades\Redirect;

class ImportController extends Controller
{
    public function importExport()
 {
  return view('importExport');
 }
 public function importExcel()
    {
    // Get current data from items table
            $titles = Item::lists('title')->toArray();

            if(Input::hasFile('import_file')){
                $path = Input::file('import_file')->getRealPath();
                $data = Excel::load($path, function($reader) {
                })->get();

                if(!empty($data) && $data->count()){
                    $insert = array();

                    foreach ($data as $key => $value) {
                        // Skip title previously added using in_array
                        if (in_array($value->title, $titles))
                            continue;

                        $insert[] = ['title' => $value->title, 'description' => $value->description];

                        // Add new title to array
                        $titles[] = $value->title;
                    }

                    if(!empty($insert)){
                        DB::table('items')->insert($insert);
                    }
                }
            }
            return back();
    }
}
* The above code will help you to resist from uploading redundant data.
10. Now let's create the view page and name it as importExpor.blade.php and use the following code:
10. Now let's create the view page and name it as importExpor.blade.php and use the following code:
<html lang="en">
<head>
 <meta charset="UTF-8">
 <title>Import  Laravel </title>
 <link rel="stylesheet" href="https://maxcdn.bootstrapcdn.com/bootstrap/3.3.6/css/bootstrap.min.css" >
</head>
<body>
 <nav class="navbar navbar-default">
  <div class="container-fluid">
   <div class="navbar-header">
    <a class="navbar-brand" href="#"> Import Excel or CSV into  Database</a>
   </div>
  </div>
 </nav>
 <div class="container">
  <form style="border: 4px solid #a1a1a1;margin-top: 15px;padding: 10px;" action="{{ URL::to('importExcel') }}" class="form-horizontal" method="post" enctype="multipart/form-data" >
   <input type="file" name="import_file" />
     {!! Form::token(); !!}
                 {!!   csrf_field() ; !!}
   <button class="btn btn-primary">Import File</button>
  </form>
 </div>
</body>
</html>
11. Now if you access the route you'll see the view page and by clicking on 'choose file' button you can choose the file and by clicking on 'import file' you can import the file into database successfully.
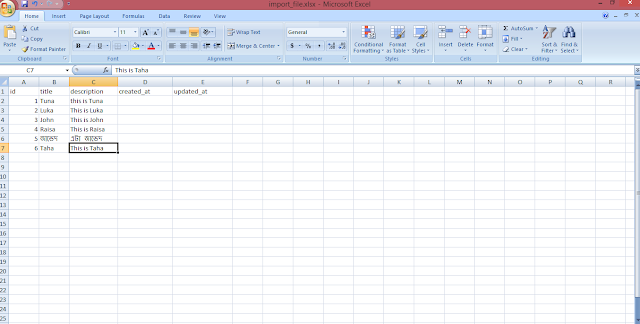
12. Here is a demo of Excel file which you can upload:
I hope you like the tutorial. By this tutorial you can import the csv or excel file easily into database.


0 comments:
Post a Comment