Wednesday, July 27, 2016

How to install Jekyll on Windows? | How to make a Website using Jekyll?


jekyll


Jekyll is a popular platform to transform your plain text into static Website or Blog. It's very easy to install on windows. Let's see how  you can install it with just 3 commands.


1. Open the command prompt ( cmd ) with administrative mood access.
2. Run the following command:

@powershell -NoProfile -ExecutionPolicy Bypass -Command "iex ((New-Object System.Net.WebClient).DownloadString('https://chocolatey.org/install.ps1'))" && SET PATH=%PATH%;%ALLUSERSPROFILE%\chocolatey\bin

3. Close the command prompt and open a new cmd with administrative  access.
4. Now Run the following command:

choco install ruby -y

5. Now again  close the command prompt and open a new cmd with administrative  access.
6. Now Run the following command:

gem install jekyll
7. Close the command prompt.

Jekyll has successfully installed. Now let's make a demo website :

1. Open cmd in the directory where you want to keep the blog file. Run the following command one after another finished :

jekyll new testblog

cd testblog

jekyll serve

So our jekyll server has started. Now in browser write the following url and You'll your test website:

http://localhost:4000/

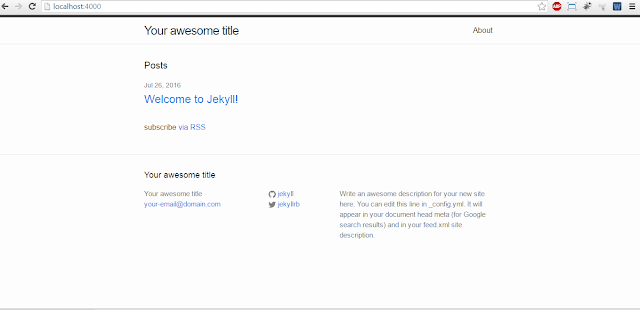
You'll see your test Website like following :

jekyll demo


So that's it for today. Hope you like the short tutorial on Jekyll.


Tuesday, July 26, 2016

Laravel 5 database backup | How to backup your database using Laravel Backup package?

Laravel Database backup


It's a good habit if you maintain a backup database of your project. So that every update of your database will be kept track. Or otherwise some deleted some data by mistake you can keep track of that too.

Before we start make sure you have mysqldump installed in your system. By default it already came with the XAMPP/ LAMP/ WAMP etc. But we need to add the following line in config/database.php in mysql array (for laravel only):

'dump_command_path' =>'C:\xampp\mysql\bin',
Now Let's start How you can backup your database in Laravel

1. First you need to install a package in your application.

composer require spatie/laravel-backup
2. Add the following line in providers Array of config/app.php file.
Spatie\Backup\BackupServiceProvider::class,
3.Then run the following command:
php artisan vendor:publish --provider="Spatie\Backup\BackupServiceProvider"
4. Now if you run the following command it will automatically create a backup database with date in storage/app folder in zip format.


 php artisan backup:run


Friday, July 15, 2016

Laravel Autocomplete Search with Bootstrap Typeahead JS

autocomplete search


Autocomplete search is required when we work with large database search items. Because it's not user friendly to use dropdown for every item. So when we have to large data searching we use Autocomplete Search. Here I've used popular autocomplete search using Bootstrap Typehead JS.


1. Make a Model and a Table named "Item" with the following command.

php artisan make:model Item  -m 

2. Change the Model Item.php with the following code:

<?php

namespace App;

use Illuminate\Database\Eloquent\Model;

class Item extends Model
{
      public $fillable = ['title','description'];
}

3. Change the items migration file ( you can get it in database/migrations directory with the following code:

<?php

use Illuminate\Database\Schema\Blueprint;
use Illuminate\Database\Migrations\Migration;

class CreateItemsTable extends Migration
{
    /**
     * Run the migrations.
     *
     * @return void
     */
    public function up()
    {
         Schema::create('items', function (Blueprint $table) {
            $table->increments('id');
            $table->string('title');
            $table->text('description');
            $table->timestamps();
        });
    }

    /**
     * Reverse the migrations.
     *
     * @return void
     */
    public function down()
    {
        Schema::drop("items");
    }
}


4. Now run the following command:

php artisan migrate

5. Put some demo data in database with the name and description in items table.

6. Now we have to create the route:

routes.php

<?php

Route::get('/search',[
 'uses' => 'SearchController@search',
 'as'=>'search'
 ]);

Route::get('/autocomplete',[
 'uses'=>'SearchController@autocomplete',
 'as'=>'autocomplete'
 ]);
7. Make SearchController.php with the following command:

php artisan make:controller SearchController

8.  Change the SearchController.php code with the following code:

<?php

namespace App\Http\Controllers;

use Illuminate\Http\Request;
use App\Http\Controllers\Controller;
use App\Item;

class SearchController extends Controller
{

    /**
     * Display a listing of the resource.
     *
     * @return \Illuminate\Http\Response
     */
    public function search()
    {
        return view('search');
    }

    /**
     * Show the form for creating a new resource.
     *
     * @return \Illuminate\Http\Response
     */
    public function autocomplete(Request $request)
    {
        $data = Item::select("title as name")->where("title","LIKE","%{$request->input('query')}%")->get();
        return response()->json($data);
    }
}
9. Now we have to make search.blade.php:
<html>
 <head>
  <link href="https://maxcdn.bootstrapcdn.com/bootstrap/3.3.6/css/bootstrap.min.css" rel="stylesheet">
  <script src="http://ajax.googleapis.com/ajax/libs/jquery/1.9.1/jquery.js"></script>
  <script src="https://cdnjs.cloudflare.com/ajax/libs/bootstrap-3-typeahead/4.0.1/bootstrap3-typeahead.min.js"></script>  
 </head>
 <body>

 <div class="container">
     <h1> Laravel Autocomplete Search using Bootstrap Typeahead JS</h1>   
     <input class="typeahead form-control"  type="text">
 </div>

<script type="text/javascript">
    var path = "{{ route('autocomplete') }}";
    $('input.typeahead').typeahead({
        source:  function (query, process) {
        return $.get(path, { query: query }, function (data) {
                return process(data);
            });
        }
    });
</script>
 </body>
</html>

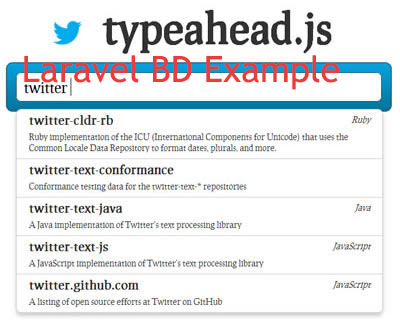
10. That's it, now when you search the route and write a name of keyword in searchBox you might have seen the relevant search name like the following:


typehead bootstrap demo


Thursday, July 14, 2016

How to create custom facade in laravel?

custom facade


Why using custom Facade?

To reduce code repetition, reduce repeated function in your application. So code will be more optimized and organized. So custom Facade will help you to use the function in anywhere in your application. So let's start how you can create a custom facade.

1. First create a file in App directory in your project. Here as an example i have created a file named javed. And then create a class called DemoClass.php inside in your javed folder. So directory would be like: App\javed\DemoClass.php

inside of your DemoClass.php let's write a function which we gonna use in different places. Write the code like following way:

<?php 
namespace App\javed;

class DemoClass {
    public function calculateSum($a,$b)
    {
        return $a+b;
    }
  
 public function calculateSub($a,$b)
 {
  return $a-$b;
 }
}
2. Now we have crate a service provider for binding the class. So let's open cmd in your project and run the following command:

php artisan make:provider 'DemoClassServiceProvider'
it'll create a empty ServiceProvider class inside of your App\Providers directory named DemoClassServiceProvider.php

3. Now in DemoClassServiceProvider.php class rewrite the register() method in following way:

DemoClassServiceProvider.php:
<?php

namespace App\Providers;

use Illuminate\Support\ServiceProvider;
use App;

class DemoClassServiceProvider extends ServiceProvider
{
    /**
     * Bootstrap the application services.
     *
     * @return void
     */
    public function boot()
    {
        //
    }

    /**
     * Register the application services.
     *
     * @return void
     */
    public function register()
    {
         App::bind('democlass', function()
        {
            return new \App\javed\DemoClass;
        });
    }
}

4.  Now we have create a Facade class inside of App\javed directory:

<?php 

namespace App\javed;
use Illuminate\Support\Facades\Facade;

class DemoClassFacade extends Facade
{
    protected static function getFacadeAccessor()
     { 
      return 'democlass';
      }
}

5. Now we have to register our own created ServiceProvide  in Config\app like the following way:

// In Providers Array

App\Providers\DemoClassServiceProvider::class,

// In Aliases Array

 'DemoClass'=> App\javed\DemoClassFacade::class,
6. Now run the following command in cmd:

composer dump-autoload

7. Our task almost done. Now Let's see how we can use the Facade in  in our application:

Route::get('democlass', function(){
    $sum = DemoClass::calculateSum(3,4);
    $sub = DemoClass::calculateSub(6,3):
    print_r($sum); echo '<pre>';
    print_r($sub);
});

Now if you access the route, We'll see the the output in first line as 7 and second line as 3.

So that's it, Now you can use this calculateSum() and calculateSub() in anywhere in your application.


Hope this tutorial is useful for you. Important topics will be covered soon. So stay connected with my blog. Thank you!







Sunday, July 10, 2016

How to generate slug in Laravel?


slug helper


Slug is  simplified version of a string for making URL-friendly  application. it generally removes non-URL-friendly characters (spaces, accented letters, ampersands etc.). The resulted string can be used as an identifier for a particular resource. Laravel provides string helper str_slug() by which we can easily slug a string. It also good for SEO friendly UR.

Let's show with an example how you can use slug in your application.

1. Let's make a route first:
Route::get('/slug',[
'uses'=>'UserController@getSlug',
'as'=>'slug'
]); 

2. Let's make the getSlug() method:

public function getSlug()
  {
      $mySlug = str_slug('It is an example post');
      print_r($mySlug);
  }

Now if you visit the route you'll get the following output:

it-is-an-example-post

See how easily you can make a SEO friendly url for your application using laravel helper.
So that's it for today. Hope you like the tutorial. Stay tune for my next Tut. Till then Good Bye!


Tuesday, July 5, 2016

How to Export CSV from Model in Laravel | How to Download Table Data / Database to CSV in Laravel

export csv from database


CSV is the best format to save data in a table structured format from your laravel application. It's almost look like excel but with a .csv extension. There is a certain steps by which you can download .csv format data from database.So Do follow the following process to export CSV from Model:


1. Make a route in routes.php file:
Route::get('/csv',[
 'uses'=>'UserController@download', 
 'as'=>'download'
 ]);
2. Let's create a method called 'download' in UserController.php :
public function download()
   {
      $table = User::all(); 
      $filename = "userList.csv";
      $handle = fopen($filename, 'w+');
      fputcsv($handle, array('Name', 'Email'));

        foreach($table as $row) {
         fputcsv($handle, array($row['name'], $row['email']));
        }

      fclose($handle);
      $headers = array('Content-Type' => 'text/csv');
      return Response::download($filename, 'userList.csv', $headers);
        }     


Now if you access the 'csv' route in your application you'll see a list of users name and email will be downloaded in a csv file from your application.

And That's how you can export CSV from Model in your laravel application.