How to Upload Laravel Project on Subdomain?
If you need to upload a Laravel Project on a Subdomain of Live Server. Here is the short tutorial on it. If you have already created a subdomain. Then you can just upload the files and route the server to public_html where you upload the files. If you don't have the subdomain, then you have to create the subdomain. Don't get tensed.I'm gonna elaborate it very easily. Let's the start the session.
1. First You have logged in your cpanel account Like : 192.185.94.163/cpanel.
2. Then If you have Database ..You need to create a User first and then database as well. If you don't have you can skip it.
3. You can create the database by clicking MySQL Databases on DATABASES section.
4. Crate a new user in MySQL Users Section like following picture.
5. Then Crate a new database Create New Database like following picture.
6. Now we need to add the user to database in Add User To Database like following picture.
7. Now we need to change the configuration of our Laravel project in .env file of Database Section.
7. Then we need to upload the laravel project inside of public_html as format .zip. After uploading we need to unzip the file.
8. Suppose we have uploaded the registration project inside of public_html. so our project directory should be like this.
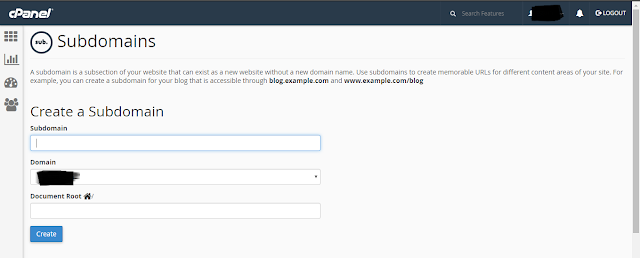
9. Now we need to create a sub domain. You can find it on DOMAINS section.
10. Give a sub domain a name . Select the main domain from dropdown. Assign Document Root to public_html/registration/public. As we already know our main project is inside of registration directory. Press the create button. And that's it. our subdomain with project has crated.
11. Now if you access the url (with subdomain). You will see your laravel project on Live.


0 comments:
Post a Comment