Tuesday, October 18, 2016

How to pass parameter from one page to another in Laravel? | How to hide parameter from URL/ Route in Laravel?

laravel parameter passing


In this session I'm gonna write about how you can pass parameter from one page to another and while passing the value how you can hide it. Let's start the discussion...


1.  Suppose I want to send a parameter through a button from the first page to another page. Here, suppose course_id .

 <li> <a  href="{{route('registration',['course_id' => Crypt::encrypt('1') ])}}">IELTS</a> </li>
2. Now We're going to encrypt the parameter first and send it to through the route 'registration' .

3. Let's write the route :

Route::get('/registration/{course_id}',[
   'uses'=>'AppController@getregistration',
    'as'=>'registration'
]);

4. Controller Part :

public function getregistration($course_id)
    {
        $course_id = Crypt::decrypt($course_id);    
        return view('index')->with('course_id',$course_id);
    }

So when we send the variable course_id from the first page to second page, you'll see the course_id as encrypted in route.

5. Now if we want to save the course_id in database inside of  our second page. You can do like that:

 <input type="hidden" name="course_id" value="{{ $course_id }}" class="form-control" >
So this is how you can send a parameter from one page to another and save into database in second page.


Laravel Event | How to send Email using Laravel Event?

laravel event listener


1. First Configure your Email Setting in you project. Do the necessary changes on .env file.
2. Run the following command first inside of your project using cmd.

php artisan make:event SendMail
3. This will generate a SendMail.php file inside App\Events directory. The file would be like this after writing the necessary codes :
<?php

namespace App\Events;

use Illuminate\Broadcasting\Channel;
use Illuminate\Queue\SerializesModels;
use Illuminate\Broadcasting\PrivateChannel;
use Illuminate\Broadcasting\PresenceChannel;
use Illuminate\Broadcasting\InteractsWithSockets;
use Illuminate\Contracts\Broadcasting\ShouldBroadcast;

class SendMail
{
    use InteractsWithSockets, SerializesModels;
    public $id;

    /**
     * Create a new event instance.
     *
     * @return void
     */
    public function __construct($id)
    {
        $this->id = $id;
    }

    /**
     * Get the channels the event should broadcast on.
     *
     * @return Channel|array
     */
    public function broadcastOn()
    {
        return new PrivateChannel('channel-name');
    }
}

4. Now run the following command for crating a listener for the event.

php artisan make:listener SendMailFire --event="SendMail"
5. This will generate a SendMailFire.php file inside App\Listeners directory. The file would be like this after writing the necessary codes :
<?php

namespace App\Listeners;

use App\Events\SendMail;
use Illuminate\Queue\InteractsWithQueue;
use Illuminate\Contracts\Queue\ShouldQueue;
use App\User;
use Mail;

class SendMailFired
{
    /**
     * Create the event listener.
     *
     * @return void
     */
    public function __construct()
    {
        //
    }

    /**
     * Handle the event.
     *
     * @param  SendMail  $event
     * @return void
     */
    public function handle(SendMail $event)
    {
          $user = User::find($event->id)->toArray();
            
          Mail::send('send', $user, function($message) use ($user) {
            $message->to($user['email']);
            $message->subject('Event Testing');
        });
    }
}
6. In above code, you are seeing a 'send' inside of your mail function. This actually a blade page which user will see. For demo purpose I'm sending the below message (send.blade.php):

<html>
    <head>
       <title>EVENT TEST MAIL</title>     
    </head>
    <body>
        <h3> Hello Event Testing ..</h3>
    </body>
</html>

7. Now Let's create a controller. So the request will be called. And event will be fired. Let's store some user data with name, email, password etc. So when a User's data saved into database the Event been fired and the User will get mail.

(UserController.php)
 public function postRegistration(Request $request)
    {
        $user = new User();         
        $user->name = $request->Input(['name']);
        $user->email=$request->Input(['email']);
        $user->password=$request->Input(['password'])       
        $user->save();        
        Event::fire(new SendMail($user->id));               
     return Response::json($user);
    }



How to Upload Laravel Project on Subdomain?

laravel project on subdomain


If you need to upload a Laravel Project on a Subdomain of Live Server. Here is the short tutorial on it. If you have already created a subdomain. Then you can just upload the files and route the server to public_html where you upload the files. If you don't have the subdomain, then you have to create the subdomain. Don't get tensed.I'm gonna elaborate it very easily. Let's the start the session.

1. First You have logged in your cpanel account Like : 192.185.94.163/cpanel.

2. Then If you have Database ..You need to create a User first and then database as well. If you don't have you can skip it.

3. You can create the database by clicking MySQL Databases on DATABASES section.

4. Crate a new user in MySQL Users Section like following picture.
mysql users

5. Then Crate a new database Create New Database like following picture.

mysql

6. Now we need to add the user to database in Add User To Database like following picture.

mysql adding database to user


7. Now we need to change the configuration of our Laravel project in .env file of Database Section.

7. Then we need to upload the laravel project inside of public_html as format .zip. After uploading we need to unzip the file.

file manager


8. Suppose we have uploaded the registration project inside of public_html. so our project directory should be like this.

public_html


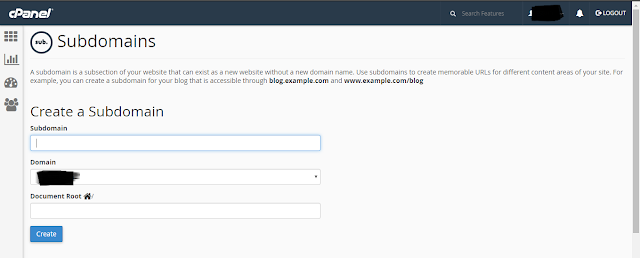
9. Now we need to create a sub domain. You can find it on DOMAINS section.

10. Give a sub domain a name . Select the main domain from dropdown. Assign Document Root to public_html/registration/public. As we already know our main project is inside of registration directory. Press the create button. And that's it. our subdomain with project has crated.

subdomain


11. Now if you access the url (with subdomain). You will see your laravel project on Live.